- Published on
Sign Language to Speech
- Authors

- Name
- Han Xingjian
- @hanxingjian
Introduction
In this project, we will create a machine learning model that is able to recognize ASL signs and turn them into speech using the Google Text To Speech (gTTS) module. In addition, the model will be able to recognize the middle finger and censor them when detected. We will be splitting the project up into 3 parts:
- Data Collection
- Model Training
- Final Product
Background
Where do we get data? This page has compiled a list of dataset aggregators which you may find useful, but for this project, we will be collecting our own dataset! One may ask, "Why go through all the trouble to collect it yourself?", well, here's why:
MediaPipe Hands
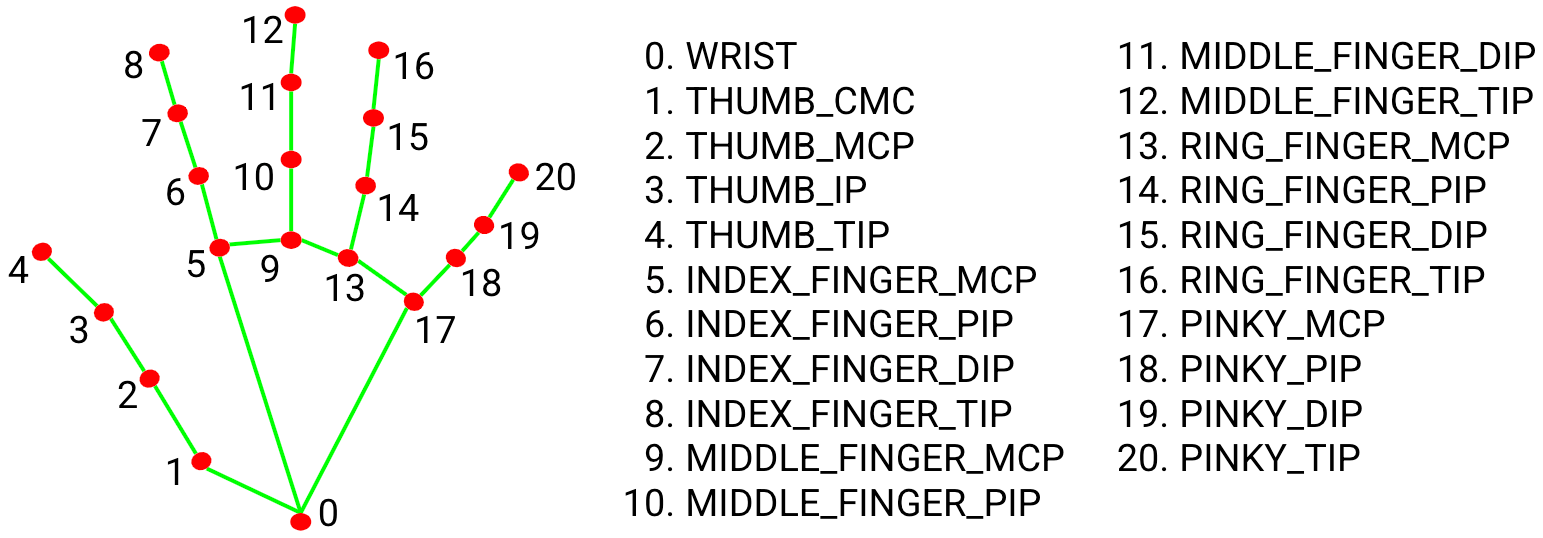
Image by Google via https://google.github.io/mediapipe/solutions/hands
This is why I prefer not to use online datasets, as the saying goes, "Garbage in, garbage out", we would have to ensure that the points are plotted correctly for each individual training image, and by doing so, may actually be more time consuming than collecting the data ourselves, furthermore, for this project, instead of learning the handsigns through images, we will be learning through the information of the 21 coordinates. This will provide a few benefits:
Faster learning
Takes up less storage space on your machine
Idependent of background noise
Less data cleaning required
Reason:
Imagine learning from a 200px * 200px image, each image will be a matrix of size 200 * 200 * 3 (RGB value), totaling to 120,000 datapoints! Of the 120,000 datapoints, not all are useful, for example, it will include information of the background which may skew the actual predictions and thus, an additional step of removing the background may be required. However, if we were to leverage on MediaPipe Hands, each sign will only be a matrix of size 21 * 3 (X,Y,Z coodinates) and all 63 datapoints are information rich and independent of background noise. With that out of the way, lets move on to the first part of the project, data collection.
1. Data Collection
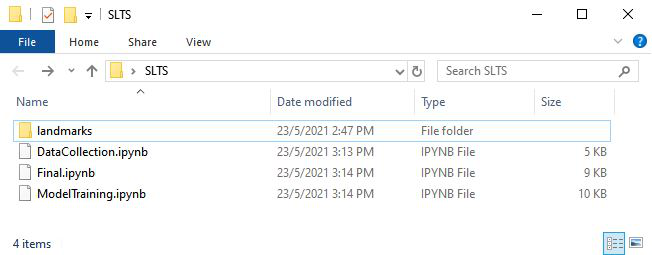
Let's first create a folder for this project. In this folder, there will be 4 files:
"landmarks" folder ➜ To store the .npz files of X and y later
DataCollection.ipynb/py ➜ Codes to collect data will be here
ModelTraining.ipynb/py ➜ Codes to train the model will be here
Final.ipynb/py ➜ Codes to put the model to use will be here
DataCollection.ipynb/py - Let's first import the required modules.
  import cv2
  import mediapipe as mp
  import numpy as np
OpenCV (cv2) is an open source computer vision and machine learning software library. In this project, we will mainly be using it to capture and read images.
We will be writing a function, reference_from_wrist which takes in 2 parameters, results and hand, which we will cover in the later part of the code. This function is implemented to do 3 things:
- Change the coordinates of the wrist to [0, 0, 0] ➜ This will allow our model to learn from the sign's coordinates irregardless of where it is being signed on the screen
- Change the remaining 20 coordinates to be referencing from the wrist ➜ Same reason as above
- Flip the coordinates along the y-axis if it is a left hand ➜ By leveraging on MediaPipe's handedness detection, we can effectively reduce the number of training data needed by half as we do not need to differentiate between left and right hand datapoints.
  def reference_from_wrist(results, hand):

    i = 0
    landmarks = []
    references = [0,0,0]
    for cords in results.multi_hand_landmarks[0].landmark:
      if i == 0:
        references[0] = cords.x
        references[1] = cords.y
        references[2] = cords.z
        landmarks.append([0,0,0])

      else:
        if hand == "Right":
          landmarks.append([cords.x - references[0],cords.y - references[1],cords.z])
        else:
          landmarks.append([references[0] - cords.x,cords.y - references[1],cords.z])
      i += 1
    return landmarks
Next, we will be declaring a few variables SIGNS ➜ List down the signs you want to capture, in this case, we will be spelling out "I LOVE ML", with the space sign to indicate when to call upon gTTS. We will also be learning to recognize the middle finger
CAPTURES ➜ The number of "images" we will be capturing for each sign, in this case, 50 will suffice
image_count ➜ To keep track of the number of "images" left to capture
current ➜ Serves as an index to keep track of which sign we are currently at
X and y ➜ X to store the data points and y to store the labels of the point
  #Rename to sign name
  SIGNS = ["I","L","O","V","E","M","space","middle_finger"]
  CAPTURES = 50
  image_count = CAPTURES
  current = 0

  X = []
  y = []
The following code can be found from MediaPipe Hands. I have added and modified a few lines of code to make it work for our project. There are a few variables you can play with, for instance, "max_num_hands" is a variable which determines how many hands can be detected when the program is being run and "min_detection_confidence" and "min_tracking_confidence" will determine how confident the model has to be before plotting the coordinates.
In the code, by pressing space, we will pass the results and the handedness of the processed hand image from mediapipe to the function, reference_from_wrist. "results" contains quite a few things, however, we just need the coordinates and the handedness.
After retrieving the new landmark coordinates, we will append it and label of the current capture into the lists X and y. The capturing process will then be terminated after all the signs has been taken or the "q" button has been pressed. This will then save the lists as Numpy arrays in the landmarks folder as .npz files to be loaded later on.
  mp_drawing = mp.solutions.drawing_utils
  mp_hands = mp.solutions.hands
  # For webcam input:
  cap = cv2.VideoCapture(0)
  with mp_hands.Hands(
      max_num_hands=1,
      min_detection_confidence=0.8,
      min_tracking_confidence=0.8) as hands:
      while cap.isOpened():
          success, image = cap.read()
          if not success:
              print("Ignoring empty camera frame.")
          # If loading a video, use "break" instead of "continue".
              continue

          # Flip the image horizontally for a later selfie-view display, and convert
          # the BGR image to RGB.
          image = cv2.cvtColor(cv2.flip(image, 1), cv2.COLOR_BGR2RGB)
          # To improve performance, optionally mark the image as not writeable to
          # pass by reference.
          image.flags.writeable = False
          results = hands.process(image)

          # Draw the hand annotations on the image.
          image.flags.writeable = True
          image = cv2.cvtColor(image, cv2.COLOR_RGB2BGR)
          annotated_image = image.copy()
          if results.multi_hand_landmarks:
              hand = results.multi_handedness[0].classification[0].label

              for hand_landmarks in results.multi_hand_landmarks:
                  mp_drawing.draw_landmarks(
                      annotated_image, hand_landmarks, mp_hands.HAND_CONNECTIONS)

          k = cv2.waitKey(1)
          title = "Taking  points for image {0} {1}".format(SIGNS[current],str(image_count))
          cv2.imshow("", annotated_image)
          cv2.setWindowTitle("", title)

          #if space pressed
          if k%256 == 32:
              if results.multi_hand_landmarks != None:

                  new_landmarks = np.array(reference_from_wrist(results, hand))
                  X.append(new_landmarks)
                  y.append(SIGNS[current])

                  cv2.destroyAllWindows()
                  image_count -= 1
                  if image_count == 0:
                      current += 1
                      image_count = CAPTURES
          if cv2.waitKey(5) & 0xFF == ord("q") or current == len(SIGNS):
              np.savez("landmarks/X", np.array(X))
              np.savez("landmarks/y", np.array(y))
              break
  cap.release()
  cv2.destroyAllWindows()
2. Model Training
After collecting the data needed, we will have to train the model to recognize the signs.
ModelTraining.ipynb/py - Import the required modules
  import numpy as np
  from sklearn.preprocessing import LabelEncoder
  from tensorflow.keras import utils
  from sklearn.model_selection import train_test_split

  from keras.models import Sequential
  from keras.layers import Dense, Flatten
  from  tensorflow.keras.optimizers import Adam
Next, we will import the numpy arrays we have previously saved and split them into train and test sets.
  le = LabelEncoder()
  X = np.load("landmarks/X.npz")["arr_0"]
  y = np.load("landmarks/y.npz")["arr_0"]
  y = le.fit_transform(y)
  y = utils.to_categorical(y)
  x_train, x_test, y_train, y_test = train_test_split(X, y, test_size = 0.1,random_state=42)
Now, we will be creating the machine learning model. First, we declare it as a sequential model where we can build it layer by layer. Because our input is a matrix, we will first flatten it into a 1D array as our output layer will also be a 1D array. Next, we add 2 dense layers with 50 neurons each setting "relu" to be the activation function. A dense layer is when all the neurons in the current layer are connected to the neurons in the previous layer. The last output layer will also be a dense layer with 8 nodes, 1 for each class, having "softmax" as the activation function.
One may ask, how do we choose what activation functions to use, while there is no right answer, this article may give you a better idea to what kind of activation function is more suitable in what scenarios.
  model = Sequential()
  model.add(Flatten(input_shape=(21, 3) ))
  model.add(Dense(50, activation="relu"))
  model.add(Dense(50, activation="relu"))
  model.add(Dense(len(le.classes_), activation="softmax"))
  model.summary()
We will then compile and start training the model.
  model.compile(optimizer="adam",
  loss = "categorical_crossentropy",
  metrics = ["accuracy"])
As we are training with very lightweight data, this process should not take long.
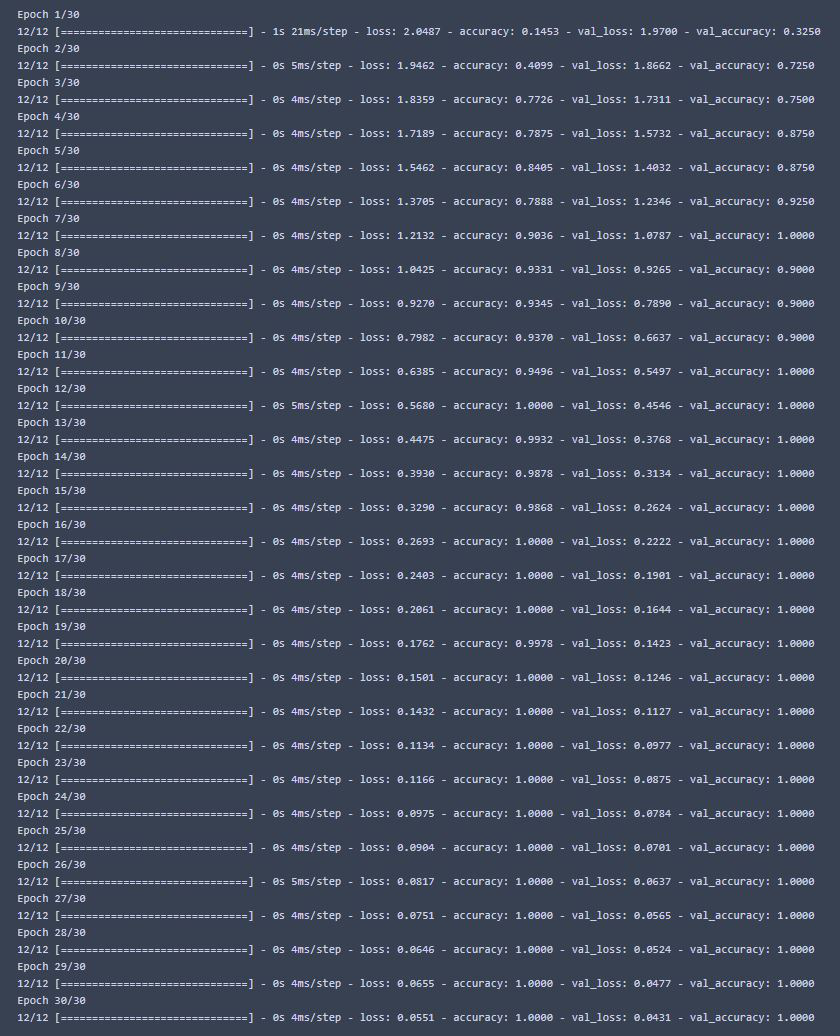
The model performs very well with the train and test sets, but what about live testing?
Proceed to save the model so we can reuse it in the future without training it again.
model.save("my_model")
3. Final Product
Final.ipynb/py - We can now test out the model! Let's import the required modules!
  import cv2
  import mediapipe as mp
  import numpy as np
  from sklearn.preprocessing import LabelEncoder
  import keras
  import threading
  from gtts import gTTS
  import playsound
  import os
Import the classes from the y.npz and load the model we have just trained!
  le = LabelEncoder()
  model = keras.models.load_model("my_model")
  y = np.load("landmarks/y.npz")["arr_0"]
  y = le.fit_transform(y)
We will now need to create 4 functions for the program to work.
reference_from_wrist ➜ This is the same function we previously wrote in "DataCollection.ipynb" to coonvert landmark coordinates
handsign_prediction ➜ We will throw in the coordinates collected real-time through our webcam input into the function. The function will then call on the model to predict the sign that is currently shown. This function will return the predicted sign and its probability
text_to_speech ➜ The function will convert the text received into audio
draw_censor ➜ This function will be called if the middle finger is detected. It take in the frame of when the middle finger is detected and the results (contains the coordinates) that MediaPipe gives and draw a black square to censor it using OpenCv's rectangle function and return the censored frame
  def reference_from_wrist(results, hand):
    i = 0
    landmarks = []
    references = [0,0,0]
    for cords in results.multi_hand_landmarks[0].landmark:
      if i == 0:
        references[0] = cords.x
        references[1] = cords.y
        references[2] = cords.z
        landmarks.append([0,0,0])

      else:
        if hand == "Right":
          landmarks.append([cords.x - references[0],cords.y - references[1],cords.z])
        else:
          landmarks.append([references[0] - cords.x,cords.y - references[1],cords.z])
      i += 1
    return landmarks

  def handsign_prediction(landmarks, show=True):
    pred = model.predict([landmarks], batch_size=1)[0]
    prob = pred[np.argmax(pred)]
    return le.classes_[np.argmax(pred)],prob

  def text_to_speech(*text):
    text = "".join(text)
    text_speech = gTTS(text=text, lang = "en")
    filename = "text_to_speech.mp3"
    text_speech.save(filename)
    playsound.playsound(filename)
    os.remove(filename)
    return

  def draw_censor(results, image):
    smallest_x = 0
    smallest_y = 0
    biggest_x = 0
    biggest_y = 0
    i = 0

    image_height, image_width, _ = image.shape

    if not results.multi_hand_landmarks == None:
      for cords in results.multi_hand_landmarks[0].landmark:
        x = cords.x * image_width
        y = cords.y * image_height
        if i == 0:
          smallest_x = int(x)
          smallest_y = int(y)
          biggest_x = int(x)
          biggest_y = int(y)
        else:
          if x < smallest_x:
            smallest_x = int(x)
          if y < smallest_y:
            smallest_y = int(y)
          if x > biggest_x:
            biggest_x = int(x)
          if y > biggest_y:
            biggest_y = int(y)
        i += 1

    image = cv2.rectangle(image,(smallest_x-50, smallest_y-50), (biggest_x+50, biggest_y), (0,0,0),-1)
    return image
Now we edit MediaPipe's code so that it can store the spelling of the words and display what is predicted. We will recognize it as part of the intended spelling if a sign remains the same for 8 frames. When space is gestured, we will then pass the word to the "text_to_speech" function which turns it into audio.
We will declare a few variables:
word ➜ Stores the letters spelled
current_word ➜ Used to check if the sign remains the same
STORE_FRAME ➜ Indicates how many frames are needed before a sign is registered, in this case, it is 8
frame➜ Indicates how many frames has passed, if 8, it will register the sign as part of the spelling.
pred ➜ Current prediction of the sign shown
prob ➜ Probability that the sign shown is predicted correctly
  word = ""
  current_word = ""
  STORE_FRAME = 8
  frame = 0
  pred = ""
  prob = 0
And finally, the code for live testing, after all, we are not interested in theoretical accuracy are we?
  mp_drawing = mp.solutions.drawing_utils
  mp_hands = mp.solutions.hands

  # For webcam input:
  cap = cv2.VideoCapture(0)
  with mp_hands.Hands(
    max_num_hands=2,
    min_detection_confidence=0.8,
    min_tracking_confidence=0.8) as hands:
    while cap.isOpened():
      success, image = cap.read()
      if not success:
        # If loading a video, use "break"instead of "continue".
        continue
      # Flip the image horizontally for a later selfie-view display, and convert
      # the BGR image to RGB.
      image = cv2.cvtColor(cv2.flip(image, 1), cv2.COLOR_BGR2RGB)
      # To improve performance, optionally mark the image as not writeable to
      # pass by reference.
      image.flags.writeable = False
      results = hands.process(image)

      # Draw the hand annotations on the image.
      image.flags.writeable = True
      image = cv2.cvtColor(image, cv2.COLOR_RGB2BGR)
      annotated_image = image.copy()
      censor_image = image.copy()
      if results.multi_hand_landmarks:
        hand = results.multi_handedness[0].classification[0].label
        new_landmarks = reference_from_wrist(results, hand)

        for hand_landmarks in results.multi_hand_landmarks:
          mp_drawing.draw_landmarks(
            annotated_image, hand_landmarks, mp_hands.HAND_CONNECTIONS)
          pred, prob = handsign_prediction(new_landmarks, show = False)
      else:
        pred = ""
        prob = 0
      # describe the type of font
      # to be used.
      font = cv2.FONT_HERSHEY_SIMPLEX
      prediction = "Prediction: "+ str(pred)
      probability = "Probability: "+ str(prob)
      # Use putText() method for
      # inserting text on video
      if prob > 0.6:
        cv2.putText(image,
                    probability,
                    (50, 80),
                    font, 0.75,
                    (0, 255, 0),
                    2,
                    cv2.LINE_4)
        if pred == "middle_finger":
          image = draw_censor(results, censor_image)

        else:
          cv2.putText(image,
                      prediction,
                      (50, 50),
                      font, 0.75,
                      (0, 255, 0),
                      2,
                      cv2.LINE_4)
            if current_word != pred:
              frame = 0
              current_word = pred
            else:
              frame += 1

            if frame == STORE_FRAME:
              if current_word == "space":
                speech = threading.Thread(target=text_to_speech, name="speech", args=word)
                speech.start()
                word = ""
                current_word = ""
                frame = 0
              else:
                word += current_word
                current_word = ""


      cv2.putText(image,
                  word,
                  (50, 110),
                  font, 0.75,
                  (0, 255, 0),
                  2,
                  cv2.LINE_4)
      cv2.imshow("MediaPipe Hands", image)

      if cv2.waitKey(5) & 0xFF == ord("q"):
          break
  cap.release()
  cv2.destroyAllWindows()
When we sign, the code will make sure that the probability of the sign being correct is > 60% before showing it as a prediction. When "space" is signed, it will then create a thread to call the "text_to_speech" function, turning the word into audio!
Project in motion!
Signing

Censoring
Final Words
I hope you guys found this project interesting and have learnt something. As this is my first machine learning project and article, there may be some mistakes so feel free to leave any feedback or comments regarding anything. Thank you for your time!